1 # **EDK II firmware for Intel(R) Quark SoC X1000 based platforms**
4 * UEFI firmware image with ability to enable/disable major features such as
6 - Source level debug using [Intel(R) UEFI Development Kit Debugger Tool](
7 https://firmware.intel.com/develop/intel-uefi-tools-and-utilities/intel-uefi-development-kit-debugger-tool)
8 - Boot Performance Measurements
9 - UEFI Secure Boot with Physical Presence
10 - TCG Measured Boot using TPM 1.2 hardware devices on I2C bus
11 * Minimal firmware image for initial power-on and debug
12 * UEFI Shell built into FLASH image
13 * UEFI Linux operating system boot support from Micro SD FLASH
15 - [Intel(R) Quark SoC X1000 CPU](
16 http://www.intel.com/content/www/us/en/embedded/products/quark/quark-x1000-datasheet.html)
17 - [Intel(R) Galileo Development Board](
18 http://www.intel.com/content/www/us/en/embedded/products/galileo/galileo-g1-datasheet.html)
19 - [Intel(R) Galileo Gen 2 Development Board](
20 http://www.intel.com/content/www/us/en/embedded/products/galileo/galileo-overview.html)
23 * Major I/O Subsystems
24 - PCI including support for Mini PCI Express Cards
25 - USB using EHCI and OHCI host controllers
26 - Micro SD FLASH with FAT file system support
27 - Serial UART up to 921600 baud for console, logging, and debug
28 * ACPI Tables with ACPI S3 sleep state support
31 ## **Windows Build Instructions**
35 * GIT client: Available from https://git-scm.com/downloads
36 * Microsoft Visual Studio.
37 - Visual Studio 2015 recommended and is used in the examples below.
38 * Microsoft Windows Driver Development Kit 3790.1830
39 - http://download.microsoft.com/download/9/0/f/90f019ac-8243-48d3-91cf-81fc4093ecfd/1830_usa_ddk.iso
41 - Right click on ```x86\kitsetup.exe``` & choose **Run as administrator**
42 - Install to C:\WINDDK\3790.1830
43 - Uncheck all Component Groups
44 - Expand Build Environment Component
45 - Check Windows Driver Development Kit 16-bit Additional Build Tools
47 * ASL compiler: Available from http://www.acpica.org
48 - Install into ```C:\ASL``` to match default tools_def.txt configuration.
49 * Python 2.7: Available from http://www.python.org
51 Create a new directory for an EDK II WORKSPACE.
53 The code block below shows the GIT clone operations required to pull the EDK II
54 source tree and the edk2-non-osi repository that provides a binary file for the
55 Quark Remote Management Unit (RMU).
57 Next it sets environment variables that must be set before running
58 ```edksetup.bat```. Since content is being pulled from multiple repositories,
59 the EDK II [Multiple Workspace](
60 https://github.com/tianocore/tianocore.github.io/wiki/Multiple_Workspace)
63 Next, the EDK II BaseTools required to build firmware images are built.
65 Next, the ```edksetup.bat``` file is run to complete the initialization of an
66 EDK II build environment. Two example build commands are shown. The first one
67 in ```QuarkPlatformPlg/Quark.dsc``` builds a full UEFI firmware image that is
68 able to boot the built-in UEFI Shell and Linux from a micro SD FLASH card. The
69 second one in ```QuarkPlatformPkg/QuarkMin.dsc``` builds a minimal firmware
70 image that is useful for initial power-on and debug of new features.
73 git clone https://github.com/tianocore/edk2.git
74 git clone https://github.com/tianocore/edk2-non-osi.git
76 set PYTHON_HOME=c:\Python27
78 set PACKAGES_PATH=%WORKSPACE%\edk2;%WORKSPACE%\edk2-non-osi\Silicon\Intel
79 set EDK_TOOLS_PATH=%WORKSPACE%\edk2\BaseTools
82 BaseTools\toolsetup.bat Rebuild
86 build -a IA32 -t VS2015x86 -p QuarkPlatformPkg/Quark.dsc
87 build -a IA32 -t VS2015x86 -p QuarkPlatformPkg/QuarkMin.dsc
90 ## **Linux Build Instructions**
96 * ASL compiler: Available from http://www.acpica.org.
99 Create a new directory for an EDK II WORKSPACE.
101 The code block below shows the GIT clone operations required to pull the EDK II
102 source tree and the edk2-non-osi repository that provides a binary file for the
103 Quark Remote Management Unit (RMU).
105 Next it sets environment variables that must be set before running
106 ```edksetup.bat```. Since content is being pulled from multiple repositories,
107 the EDK II [Multiple Workspace](
108 https://github.com/tianocore/tianocore.github.io/wiki/Multiple_Workspace)
111 Next, the EDK II BaseTools required to build firmware images are built.
113 Next, the ```edksetup.sh``` file is run to complete the initialization of an
114 EDK II build environment. Two example build commands are shown. The first one
115 in ```QuarkPlatformPlg/Quark.dsc``` builds a full UEFI firmware image that is
116 able to boot the built-in UEFI Shell and Linux from a micro SD FLASH card. The
117 second one in ```QuarkPlatformPkg/QuarkMin.dsc``` builds a minimal firmware
118 image that is useful for initial power-on and debug of new features.
121 git clone https://github.com/tianocore/edk2.git
122 git clone https://github.com/tianocore/edk2-non-osi.git
124 export WORKSPACE=$PWD
125 export PACKAGES_PATH=$WORKSPACE/edk2:$WORKSPACE/edk2-non-osi/Silicon/Intel
126 export EDK_TOOLS_PATH=$WORKSPACE/edk2/BaseTools
131 . edksetup.sh BaseTools
133 build -a IA32 -t GCC49 -p QuarkPlatformPkg/Quark.dsc
134 build -a IA32 -t GCC49 -p QuarkPlatformPkg/QuarkMin.dsc
137 ## **Build Features**
139 The table below contains a summary of the build flags to enable or disable
140 features on the build command line using ```-D``` flags.
142 | **Define Name** | **Default Value** | **Supported Values** |
143 | -------------------------- | ----------------- | -------------------- |
144 | ```GALILEO``` | GEN2 | GEN1, GEN2 |
145 | ```LOGGING``` | TRUE | TRUE, FALSE |
146 | ```SOURCE_DEBUG_ENABLE``` | FALSE | TRUE, FALSE |
147 | ```PERFORMANCE_ENABLE``` | FALSE | TRUE, FALSE |
148 | ```SECURE_BOOT_ENABLE``` | FALSE | TRUE, FALSE |
149 | ```MEASURED_BOOT_ENABLE``` | FALSE | TRUE, FALSE |
150 | ```TPM_12_HARDWARE``` | NONE | NONE, LPC, ATMEL_I2C, INFINEON_I2C |
151 | ```CAPSULE_ENABLE``` | FALSE | TRUE, FALSE |
152 | ```RECOVERY_ENABLE``` | FALSE | TRUE, FALSE |
154 * ```GALILEO``` - Used to specify the type of Intel(R) Galileo board type. The
155 default is ```GEN2``` for the [Intel(R) Galileo Gen 2 Development Board](
156 http://www.intel.com/content/www/us/en/embedded/products/galileo/galileo-overview.html).
157 The other supported value is ```GEN1``` for the [Intel(R) Galileo Development Board](
158 http://www.intel.com/content/www/us/en/embedded/products/galileo/galileo-g1-datasheet.html).
159 Add ```-D GALILEO=GEN1``` to the build command for [Intel(R) Galileo Development Board](
160 http://www.intel.com/content/www/us/en/embedded/products/galileo/galileo-g1-datasheet.html).
162 * ```LOGGING``` - Used to enable/disable logging messages from DEBUG() macros to
163 a serial UART. The default is TRUE for enabled when the BUILDTARGET is DEBUG
164 (```-b DEBUG```). The default is FALSE for disabled when the BUILDTARGET is
165 not DEBUG (e.g. ```-b RELEASE```). Add ```-D LOGGING``` to the build command
166 to force logging enabled. Add ```-D LOGGING=FALSE``` to force logging
169 * ```SOURCE_DEBUG_ENABLE``` - Used to enable/disable source level debug using the
170 [Intel(R) UEFI Development Kit Debugger Tool](
171 https://firmware.intel.com/develop/intel-uefi-tools-and-utilities/intel-uefi-development-kit-debugger-tool).
172 The default is FALSE for disabled. Add ```-D SOURCE_DEBUG_ENABLE``` to the
173 build command line to enable source level debug.
175 * ```PERFORMANCE_ENABLE``` - Used to enable/disable boot performance measurement.
176 The default is FALSE for disabled. Add ```-D PERFORMANCE_ENABLE``` to the
177 build command line to enable boot performance measurement. When this feature
178 is enabled, both ```LOGGING``` and ```SOURCE_DEBUG_ENABLE``` are automatically
179 disabled so there is not boot time overhead from the serial UART for logging
180 messages or the debug agent.
182 * ```SECURE_BOOT_ENABLE``` - Used to enable/disable UEFI Secure Boot features.
183 The default is FALSE for disabled. Add ```-D SECURE_BOOT_ENABLE``` to the
184 build command line to enable UEFI Secure Boot features.
186 * ```MEASURED_BOOT_ENABLE``` - Used to enable/disable measurement of firmware
187 code and data into a TPM 1.2 hardware device. The default is FALSE for
188 disabled. Add ```-D MEASURED_BOOT_ENABLE``` to the build command line to
189 enable UEFI Secure Boot features.
191 * ```TPM_12_HARDWARE``` - Used to specify the type of TPM 1.2 hardware device
192 that is connected to the Galileo board. This define is valid if the measure
193 boot feature is enabled using ```-D MEASURED_BOOT_ENABLE```. The default is
194 NONE for no TPM 1.2 hardware device connected. Add ```-D TPM_12_HARDWARE=LPC```
195 for a TPM hardware device attached to an LPC bus (not supported on on Intel(R)
196 Quark SoC X1000). Add ```-D TPM_12_HARDWARE=ATMEL_I2C``` for an
197 [Atmel AT97SC3204T](http://www.atmel.com/devices/AT97SC3204T.aspx) or
198 [Atmel AT97SC3205T](http://www.atmel.com/images/atmel-8883s-tpm-at97sc3205t-datasheet-summary.pdf)
199 attached to the I2C bus of the Galileo Arduino header. Add
200 ```-D TPM_12_HARDWARE=INFINION_I2C``` for an [Infineon SLB9645](
201 http://www.infineon.com/dgdl/Infineon-TPM+SLB+9645-DS-v01_00-EN.pdf?fileId=5546d4625185e0e201518b83d0c63d7c)
202 attached to the I2C bus of the Galileo Arduino header. The ATMEL_I2C setting
203 has been tested with the [CryptoShield](https://www.sparkfun.com/products/13183)
204 available from [SparkFun](https://www.sparkfun.com/).
206 * ```CAPSULE_ENABLE``` - Used to enable/disable capsule update features.
207 The default is FALSE for disabled. Add ```-D CAPSULE_ENABLE``` to the
208 build command line to enable capsule update features.
209 The build process generate capsule update image - QUARKFIRMWAREUPDATECAPSULEFMPPKCS7.Cap.
210 The user need copy QUARKFIRMWAREUPDATECAPSULEFMPPKCS7.Cap and CapsuleApp.efi
211 to a storage media attached to the Quark Board.
212 Then the user can boot to shell and run ```CapsuleApp QUARKFIRMWAREUPDATECAPSULEFMPPKCS7.Cap```.
213 In next reboot, the system firmware is updated.
215 * ```RECOVERY_ENABLE``` - Used to enable/disable recovery features.
216 The default is FALSE for disabled. Add ```-D RECOVERY_ENABLE``` to the
217 build command line to enable recovery features.
218 The build process generates the recovery capsule image - QUARKREC.Cap.
219 Then the user need copy QUARKREC.Cap to a USB KEY, plug the USB KEY to the Quark Board.
220 In next boot, if a user runs ForceRecovery.efi in shell, or if a user presses the RESET button during power on, warm reset or REBOOT,
221 or if the FvMain is corrupted in flash, the system will boot into recovery mode.
223 ### **Example Build Commands**
225 Default build with logging enabled:
227 ```build -a IA32 -t VS2015x86 -p QuarkPlatformPkg/Quark.dsc```
229 Release build with logging disabled:
231 ```build -a IA32 -t VS2015x86 -p QuarkPlatformPkg/Quark.dsc -b RELEASE```
233 Enable source level debugging:
235 ```build -a IA32 -t VS2015x86 -p QuarkPlatformPkg/Quark.dsc -D SOURCE_DEBUG_ENABLE```
237 Enable boot performance metrics:
239 ```build -a IA32 -t VS2015x86 -p QuarkPlatformPkg/Quark.dsc -D PERFORMANCE_ENABLE```
241 Enable UEFI Secure Boot features:
243 ```build -a IA32 -t VS2015x86 -p QuarkPlatformPkg/Quark.dsc -D UEFI_SECURE_BOOT```
245 Enable UEFI Secure Boot and Measured Boot using Atmel I2C TPM hardware device:
247 ```build -a IA32 -t VS2015x86 -p QuarkPlatformPkg/Quark.dsc -D UEFI_SECURE_BOOT
248 -D MEASURED_BOOT_ENABLE -D TPM_12_HARDWARE=ATMEL_I2C```
250 ## **FLASH Update using DediProg SF100**
252 Once the sources have been downloaded, an EDK II build environment established,
253 and an EDK II firmware image has been built, the EDK II firmware image needs to
254 installed into the FLASH device on the target Galileo development board. One
255 way to do this is with the [Dediprog SF100 IC Programmer](
256 http://www.dediprog.com/pd/spi-flash-solution/SF100).
258 * Install the DediProg SF100 software.
260 * Connect the DediProg SF100 to the Galileo development board.
262 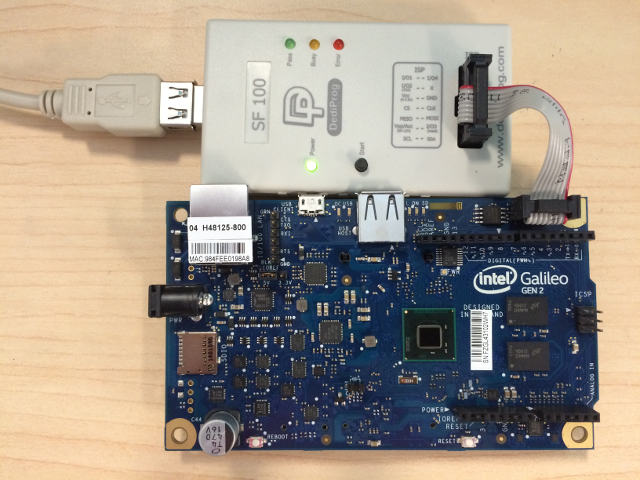
264 * Make sure ```dpcmd.exe``` is in ```PATH```
266 ```PATH=%PATH%;"c:\Program Files (x86)\DediProg\SF100"```
268 * **NOTE**: It is recommended that the FLASH image that was shipped with the
269 Galileo development board be read and saved before updating FLASH image. The
270 command shown below read the FLASH image and saves it to the file
271 called ```GalileoOriginalFirmware.bin```.
273 ```dpcmd.exe -r GalileoOriginalFirmware.bin```
275 * Update FLASH image using either the DediProg SF100 GUI or ```dpcmd.exe```.
276 - Example update of Galileo firmware image when BUILDTARGET is DEBUG (default)
278 ```dpcmd.exe -u%WORKSPACE%\Build\Quark\DEBUG_VS2015x86\FV\QUARK.fd ```
280 - Example update of Galileo firmware image when BUILDTARGET is RELEASE
283 ```dpcmd.exe -u%WORKSPACE%\Build\Quark\RELEASE_VS2015x86\FV\QUARK.fd ```
285 ## **Setting up a Serial Console and Booting to UEFI Shell**
287 After the FLASH is updated on Galileo, a serial cable is connected between the
288 host system and the Galileo target. A serial terminal emulator (such as
289 [Tera Term](https://en.osdn.jp/projects/ttssh2/releases/)) can be used to see
290 the logging messages from DEBUG() macros and the serial console for the UEFI
291 Boot Manager, UEFI Shell, and operating system.
293 The default serial communication parameters for the Intel(R) Galileo Gen 2
294 Development Board is 921600,n,8,1 with no hardware flow control.
296 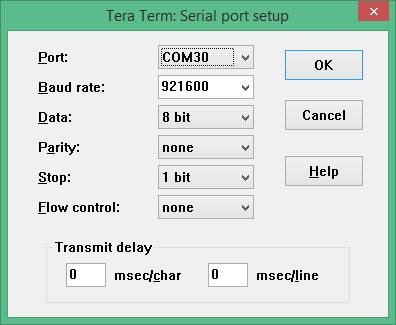
298 The default serial communication parameters for the Intel(R) Galileo Development
299 Board is 461800,n,8,1 with no hardware flow control.
301 The following changes to the [Tera Term](https://en.osdn.jp/projects/ttssh2/releases/)
302 configuration files are recommended for UEFI serial console compatibility.
303 Some of the later use cases involve using the TCPIP mode, so some of these
304 recommendation apply to the TCPIP use cases.
306 * TERATERM.INI - Set terminal size to 80 x 25 and terminal settings to UTF8.
308 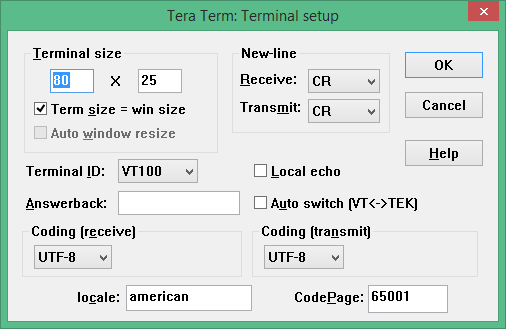
310 * TERATERM.INI - Set font type to Terminal to support box drawing glyphs.
312 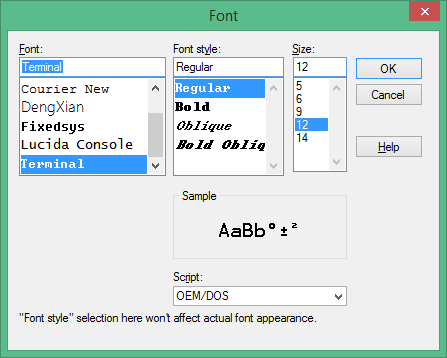
314 * TERATERM.INI - Disable line mode to make TCPIP mode work like COM port mode.
317 ; Line at a time mode
321 * KEYBOARD.CNF - Disable VT function keys for F5..F10
337 * KEYBOARD.CNF - Disable X function keys for F1..F4
356 * KEYBOARD.CNF - Add UEFI serial console sequences for F1..F10
372 Connect power adapter to Galileo development board, and the logging messages
373 should be seen, followed by 5 second countdown, followed by an automatic boot to
374 the built-in UEFI Shell.
376 
378 ## **Source Level Debug Using Intel(R) UEFI Development Kit Debugger Tool**
382 * Intel(R) UEFI Development Kit Debugger Tool User Manual for Ver 1.5 or higher:
383 Available from https://firmware.intel.com/develop/intel-uefi-tools-and-utilities/intel-uefi-development-kit-debugger-tool
384 * Intel(R) UEFI Development Kit Debugger Tool Ver 1.5 or higher: Available from
385 https://firmware.intel.com/develop/intel-uefi-tools-and-utilities/intel-uefi-development-kit-debugger-tool
386 * [Tera Term](https://en.osdn.jp/projects/ttssh2/releases/) or other serial
387 terminal emulator with TCPIP support
389 Follow instructions in Intel(R) UEFI Development Kit Debugger Tool User manual
390 to setup host system.
392 Build a firmware image with SOURCE_DEBUG_ENABLE enabled
393 (```-D SOURCE_DEBUG_ENABLE```). This will select the appropriate libraries,
394 debug agent, and PCDs for Galileo. Galileo does not support a USB 2.0 debug
395 port, so only the UART based communications library is used.
397 Use Dediprog SF100 to update the Galileo development board FLASH image.
399 Update the ```[Debug Port]``` section of the SoftDebugger.ini file with the host
400 side UART configuration settings. The following example uses COM5, which must
401 be updated with the COM port the Galileo target is attached. The following
402 example also shows a baud rate of 921600 which is correct for a Galileo Gen 2.
403 If a Galileo Gen 1 is being used, set the baud rate to 460800. By default, the
404 Galileo console is redirected to TCPIP port 20715.
415 Connect power adapter to Galileo development board and run a command script with
416 the contents below to start a Tera Term session on TCPIP port 20715 and start
417 the Intel(R) UEFI Development Kit Debugger Tool using UART connection between
418 the host and target and WinDbg. The REBOOT button on the Galileo development
419 board may need to be pressed for the debugger to perform the initial connect.
422 start "Console" /B "c:\Program Files (x86)\teraterm\ttermpro.exe" localhost:20715 /nossh
423 start "Debugger" /B "C:\Program Files (x86)\Intel\Intel(R) UEFI Development Kit Debugger Tool\eXdi.exe" /LaunchWinDbg
426 The figure below should be seen when a connection is made. The SoftDebugger
427 Debug Console window shows the status of the connection between the host and the
428 target. The Tera Term window shows the console output from the SEC phase until
429 the debug agent is initialized. The WinDbg window shows that the debugger is
430 connected and the WinDbg application can be used for run control, breakpoint
431 management, and viewing call stacks, local variables, global variables, etc.
433 
435 ## **Debug Using Intel(R) System Debugger using OpenOCD**
437 Setup hardware and software components following the instructions in the article at:
438 https://software.intel.com/en-us/articles/using-intel-system-debugger-with-openocd
440 Connect power adapter to Galileo development board.
442 The following batch file starts Tera Term serial console on COM5 at 921600 baud,
443 starts OpenOCD using a Flyswatter2, and starts Intel(R) System Studio Debugger.
444 Select the **Connect** button to complete the host to target connection.
447 set OPENOCD="C:\Program Files (x86)\IntelSWTools\system_studio_for_windows_2016.0.023\debugger\openocd"
448 start "Console" /B "c:\Program Files (x86)\teraterm\ttermpro.exe" /C=5 /BAUD=921600
449 start "OpenOcd" /B %OPENOCD%\bin\openocd.exe -f ..\scripts\interface\ftdi\flyswatter2.cfg -f ..\scripts\board\quark_x10xx_board.cfg
450 call "C:\Program Files (x86)\IntelSWTools\System Debugger 2016\system_debugger\start_xdb_gdb_remote.bat"
453 When **Reset Target** is selected, the Galileo development board does not always
454 halt at the first instruction at the reset vector. If debug is required from
455 the first instruction of the reset vector, then update the file
456 ```UefiCpuPkg/SecCore/Ia32/ResetVector.asm``` and change the two NOP
457 instructions at the label ```ResetHandler:``` to ```JMP $```. This puts the CPU
458 into a wait loop until the debugger is connected and the debugger is used to set
459 instruction pointer to the next instruction.
463 ; For IA32, the reset vector must be at 0xFFFFFFF0, i.e., 4G-16 byte
464 ; Execution starts here upon power-on/platform-reset.
472 ; Jmp Rel16 instruction
473 ; Use machine code directly in case of the assembler optimization
474 ; SEC entry point relative address will be fixed up by some build tool.
476 ; Typically, SEC entry point is the function _ModuleEntryPoint() defined in
483 ## **Install, Configure, and Boot Linux**
485 * Download SD Card Linux Image: Available at
486 http://www.intel.com/content/www/us/en/support/boards-and-kits/intel-galileo-boards/000005614.html
487 * Extract the SD Card Linux Image to a FAT formatted Micro SD FLASH device
488 * Install Micro SD FLASH device into Galileo development board
490 Connect power adapter to Galileo development board and boot to the UEFI Shell.
492 From the UEFI Shell execute the following commands to copy the GRUB EFI boot
493 loader to ```\efi\boot\bootia32.efi```. This allows the UEFI Boot Manager, on
494 all future boots, to auto detect that the Micro SD FLASH device is bootable.
502 FS0:> cp grub.efi efi\boot\bootia32.efi
505 The GRUB boot loader is set to a UART baud rate of 115200. A couple changes are
506 required to change the baud rate to 460800 for Galileo Gen 1 or 921600 for
507 Galileo Gen 2. From the UEFI Shell, execute the following commands to make a
508 backup copy and edit the GRUB configuration file.
511 FS0:> cp boot\grub\grub.conf boot\grub\grub.conf.org
512 FS0:> edit boot\grub\grub.conf
515 * Delete the lines associated with the boot option with the following title.
518 title Clanton SVP kernel-SPI initrd-SPI IMR-On IO-APIC/HPET NoEMU
521 * Replace the two instances of 115200 in the following line to 460800 for
522 Galileo Gen 1 or 921600 for Galileo Gen 2.
525 kernel /bzImage root=/dev/ram0 console=ttyS1,115200n8 earlycon=uart8250,mmio32,$EARLY_CON_ADDR_REPLACE,115200n8 reboot=efi,warm apic=debug rw LABEL=boot debugshell=5 rootimage=image-full-galileo-clanton.ext3
527 * Press F3 to save the file
528 * Run the ```exit``` command to exit from the UEFI Shell and return to the
530 * Select **Boot Manager**
531 * Select **UEFI Misc Device** for the Micro SD FLASH device.
532 * GRUB should run and Linux should boot with serial log messages.
533 * When the serial log messages stop, change the Tera Term baud rate to 115200
534 * Login as ```root```. No password is required.
535 * Use ```vi``` to edit ```/etc/inittab```
536 * Change the baud rate of ttyS1 from 115200 to 460800 for Galileo Gen 1 or
537 921600 for Galileo Gen 2. The line that need to be updated is shown below
540 S:2345:respawn:/sbin/getty 115200 ttyS1
543 * Save the updated ```/etc/inittab```
544 * Run ```reboot -f``` to shutdown Linux and reboot the platform.
545 * Set the Tera Term baud rate back to 460800 for Galileo Gen 1 or 921600 for
548 After these changes both the EDK II firmware and the Linux operating system use
551 ### **Testing ACPI S3 Sleep**
553 The ACPI S3 Sleep and Resume feature can be tested on a Galileo development
554 board using the Real Time Clock (RTC) for a wake event. The shell script shown
555 below arms the RTC wake alarm 10 seconds in the future and puts the system to
556 sleep. A shorter time in seconds can be passed in as the first argument to the
557 script, but do not use times shorter than 2 or 3 seconds.
559 **NOTE**: The stmmac module is unloaded because the module is not compatible
564 # Unload NIC driver that causes S3 to fail
569 # Disable RTC wake alarm
571 echo 0 > /sys/class/rtc/rtc0/wakealarm
574 # Compute wake time that is $1 seconds in the future
576 let WakeTime=`date '+%s'`
579 let WakeTime=$WakeTime+10
581 let WakeTime=$WakeTime+$1
586 # Enable RTC wake alarm $1 seconds in the future
588 echo $WakeTime > /sys/class/rtc/rtc0/wakealarm
591 # Put systems into ACPI S3 sleep state
593 echo mem > /sys/power/state
596 ## **UEFI Secure Boot Feature and Physical Presence**
598 Build a firmware image with SECURE_BOOT_ENABLE enabled
599 (```-D SECURE_BOOT_ENABLE```). This builds in support for UEFI authenticated
600 variables, UEFI image verification, and UEFI Secure Boot configuration screens
601 in the Device Manager. In order to change the UEFI Secure Boot configuration,
602 the user must assert physical presence. The Galileo development board only has
603 two push buttons (REBOOT and RESET). The REBOOT button unconditionally reboots
604 the platform. The RESET button asserts the reset signal on the Arduino header
605 and is also connected to a GPIO pin, so the state of the RESET button can be
606 read. The user asserts physical presence by holding the RESET button while the
607 Galileo development board boots, or by holding the RESET button while selecting
608 the **Secure Boot Configuration** option in the Device Manager.
610 Use Dediprog SF100 to update the Galileo development board FLASH image.
612 Connect power adapter to Galileo development board and boot to the UEFI Boot
613 Manager by pressing F2 or running the ```exit``` command from the UEFI Shell.
614 Select **Device Manager** and then**Secure Boot Configuration**. Change
615 **Customize Secure Boot** to **Customized** and then select **Custom Secure Boot
616 Options**. If **Custom Secure Boot Options** can not be selected, then physical
617 presence was not asserted using one of two methods listed above. Assert
618 physical presence and try again.
620 The **Custom Secure Boot Options** screen allows the Galileo development board
621 to be enrolled into UEFI Secure Boot. See [How to Sign UEFI Drivers & Application V1.31](
622 http://sourceforge.net/projects/edk2/files/General%20Documentation/SigningUefiImages%20-v1dot31.pdf/download)
623 in the [SecurityPkg Wiki](https://github.com/tianocore/tianocore.github.io/wiki/SecurityPkg)
624 for details on how to complete the UEFI Secure Boot enrollment.
626 ## **Enable Measured Boot Feature using Atmel I2C TPM on CryptoShield**
628 Build a firmware image with MEASURED_BOOT_ENABLE enabled
629 (```-D MEASURED_BOOT_ENABLE```) and TPM_12_HARDWARE set to ATMEL_I2C
630 (```-D TMP_12_HARDWARE=ATMEL_I2C```). This builds in the TCG PEIM and DXE
631 modules and uses the library for the Atmel I2C TPM hardware device.
633 Use Dediprog SF100 to update the Galileo development board FLASH image.
635 Attach the CryptoShield to the Arduino header of the Galileo development board
638 
640 Connect power adapter to Galileo development board and boot to the UEFI Shell.
641 In the boot logging messages, messages similar to the following should be seen
642 as the Atmel I2C TPM hardware device is detected and used to measure the
643 contents of firmware volumes and firmware tables.
646 Loading PEIM at 0x0000FC75188 EntryPoint=0x0000FC75260 TrEEConfigPei.efi
647 PROGRESS CODE: V03020002 I0
648 TrEEConfiguration.TpmDevice from Setup: 1
651 TpmDevice PCD: 8B01E5B6-4F19-46E8-AB93-1C53671B90CC
653 Loading PEIM at 0x0000FC70190 EntryPoint=0x0000FC70260 TcgPei.efi
654 PROGRESS CODE: V03020002 I0
655 Install PPI: E9DB0D58-D48D-47F6-9C6E-6F40E86C7B41
656 Install PPI: A030D115-54DD-447B-9064-F206883D7CCC
657 PROGRESS CODE: V03020003 I0
658 The FV which is measured by TcgPei starts at: 0xFFF10000
659 The FV which is measured by TcgPei has the size: 0xF0000
660 The FV which is measured by TcgPei starts at: 0xFFD00000
661 The FV which is measured by TcgPei has the size: 0x1E0000
663 Loading driver at 0x0000F620000 EntryPoint=0x0000F620260 TcgDxe.efi
665 TPM TcgDxe Measure Data when ReadyToBoot
667 See the [SecurityPkg Wiki](https://github.com/tianocore/tianocore.github.io/wiki/SecurityPkg)
668 for additional details on EDK II TPM support
670 ## **Measuring Boot Performance**
672 Build a firmware image with PERFORMANCE_ENABLE enabled
673 (```-D PERFORMANCE_ENABLE```). This builds in the UEFI Shell and the DP.EFI
674 (Dump Performance) into a firmware volume and also includes a simple file system
675 driver for firmware volumes so the DP.EFI command can be run out of the FLASH.
677 Use Dediprog SF100 to update the Galileo development board FLASH image.
679 Connect power adapter to Galileo development board and let it boot to the UEFI
680 Shell. Then use the REBOOT button or the ```reset``` UEFI Shell command to
681 reboot the Galileo development board. The first boot after a FLASH update does
682 extra work that is only performed one time. In order to get correct performance
683 measurements, use the 2nd or later boots. After the 2nd boot, run the
684 ```dp -s``` command. The output should look similar to the figure below.
686 